BEFORE EXCEL 2016
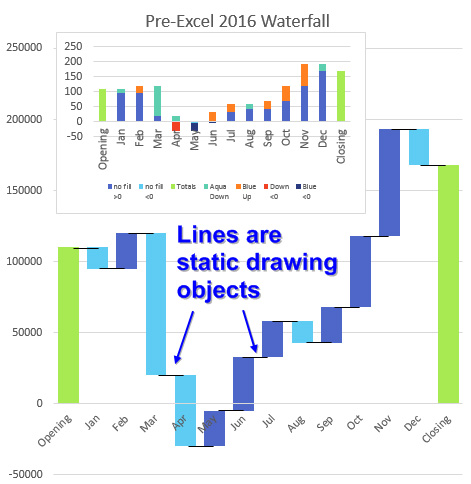
Figure 1 shows a waterfall chart created in an earlier version of Excel.
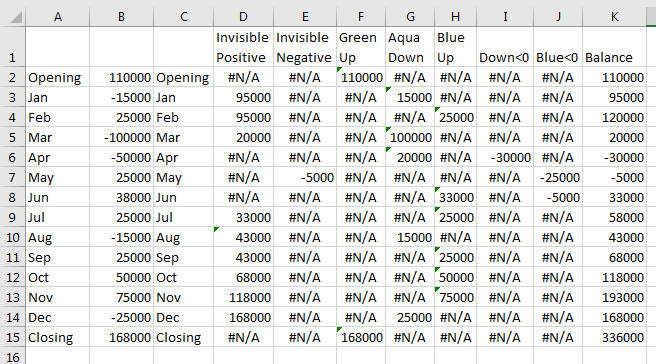
The inset identifies the seven different series needed to create the chart: (1) opening and closing values, (2) increases above the 0-axis, (3) decreases above the 0-axis, (4) invisible (no fill) positive, (5) increases below the 0-axis, (6) decreases below the 0-axis, and (7) invisible (no fill) negative. Figure 2 shows the data for seven series.
The larger chart in Figure 1 shows the results after two series are set to have no fill and the five other series are set to have three colors. All of this trickery is required to make the April column appear as if it starts at $20,000 and dives down $50,000 to end up at -$30,000. In order to make that appear as a single column, you need one series to represent the $0 to $20,000 portion of the column and another series to represent the $0 to -$30,000 portion of the column. In the final chart, both of these series are colored aqua to make it look like a single series.
The horizontal bars between columns are static lines drawn in by hand. If a number changes or the zoom is changed, those lines will need to be repositioned manually.
Also missing from Figure 1 are numeric labels. To be accurate, the labels would have to appear above the blue and green columns and below the aqua columns. This would require more manual textboxes or yet another series plotted as an X-Y scatter chart.
All of this trickery can be retired with the September 2015 release of Office 2016, as this version of Excel now natively supports waterfall charts. (If you have an Office 365 subscription, you should be able to download Excel 2016 now. Others will have to wait until the boxed release of Office 2016 hits stores later this month.) Among the new features in Excel 2016 are 3D maps, Power Query, forecasting tools, and six new chart types: waterfall, box & whisker, histogram, Pareto, tree map, and sunburst.
INITIAL CHART
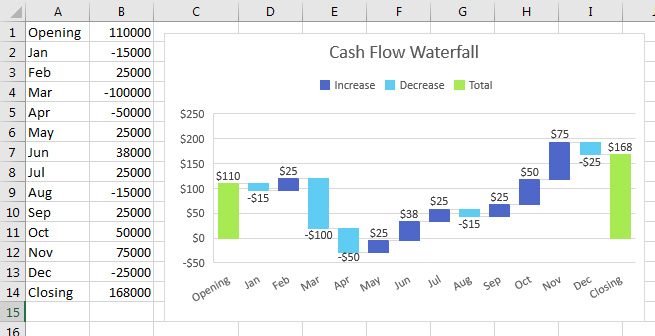
To create the waterfall chart in Excel 2016, first enter the data as shown in columns A:B in Figure 3. Row 1 is the opening balance. Rows 2-13 are the increase or decrease for each month, and Row 14 is the closing balance. Highlight the data (cells A1:B14). Go to the Insert tab. In the Charts group, click on the new dropdown icon for Insert Waterfall or Stock Chart, and choose Waterfall chart.
At first, Excel 2016 will draw a chart that looks promising but has one major problem—Excel guesses that the Closing value of $168,000 in B14 is an increase from December, so the chart ends up with the wrong final value.
There’s a simple fix for that, which we’ll get into, but let’s focus first on the positive aspects of the initial chart: Excel 2016 automatically places labels above the columns that show an increase and below the columns that show a decrease, the connector lines between the columns are automatically drawn in, and there’s no problem with a column that starts on one side of zero and travels to the other side.
DECLARING TOTALS
Now for the simple fix. When you first create the chart, the opening and closing balances are shown as increases. While this might not cause a problem for the opening balance, it definitely makes the closing balance too high.
Here are the steps to mark the closing balance as a Total:
- Click once on the chart to select it.
- Click once on any column in the chart to select Series 1.
- Click once on the Closing balance column to select only that data point. If you do this correctly, the other columns will dim.
- Right-click the data point, and choose Set As Total.
- While the data point for the Closing balance column is selected, you can also right-click on the Opening balance column and choose Set As Total.
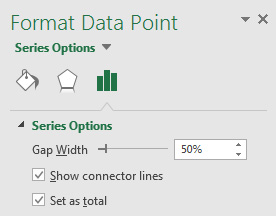
The other option available for Excel 2016 waterfall charts is the Show Connector Lines setting (see Figure 4). This draws the horizontal bars from the bottom of one column to the top of the next column. It’s enabled by default, but you can turn it off if desired.
The Excel team members who built the waterfall chart studied a number of tutorials describing the painful workarounds required in earlier versions of Excel. They did an excellent job solving the common waterfall issues.
SF SAYS
Happy 30th Anniversary Microsoft Excel!
It all began on September 30, 1985, with version 1.0 of Excel. To celebrate, SF readers can download a free copy of Bill Jelen’s 40th book, MrExcel XL—The 40 Greatest Excel Tips Of All Time, during the month of September. Visit http://mrx.cl/imafreebook.

September 2015


