There are several ways to open the Expression Builder. In Design view for a table, go to the Field Properties pane and click on the property that will contain the expression. For a form or report, go to the Property Sheet while in Design view and select the property that will contain the expression. If the builder is available, a button containing an ellipses (…)will appear to the right of the property field. This is the Build button. You can click that button to open the Expression Builder. Other alternatives are the shortcut keystroke Ctrl+F2 (which I usually use) or right-click on the property and choose Build from the shortcut menu.
In the Design view of a query, you won’t see the ellipses, but you can launch the Expression Builder with the Builder icon on the Design Ribbon, by pressing Ctrl+F2, or by right-clicking to open the shortcut menu in, for instance, a field or criteria cell.
At the top of the Expression Builder dialog is a large textbox where you can enter an expression. It uses Intellisense, so if you begin typing, built-in prompts will appear based on what you type. To increase or decrease the font size of the text you’re entering, hold down Ctrl and scroll your mouse wheel up or down.
You can also build your expressions by choosing elements from the lists located below the text box. If you don’t see the three panes, click the More button on the right of the dialog. To collapse the lower panes, click the Less button.
The left pane, Expression Elements, shows general objects in your database, such as the queries or tables, as well as functions, constants, operators, and common expressions. In the middle pane is Expression Categories, and the right pane is Expression Values; these change depending on what is selected in the Expression Elements pane. If a table or query is selected, Expression Categories in the middle will list the fields while Expression Elements on the right displays properties. For forms and reports, it will be control and other object names in the middle and properties on the right. For functions, categories are in the middle and function names are on the right. Other choices change depending on context.
When available, syntax and brief descriptions appear at the bottom of the dialog when you select certain items. If any displayed text appears as a blue, underlined hyperlink, you can click on it to go to a Help page with more information. In any of the panes, double-click an item to add it to the expression in the top box.
BUILD AN EXPRESSION
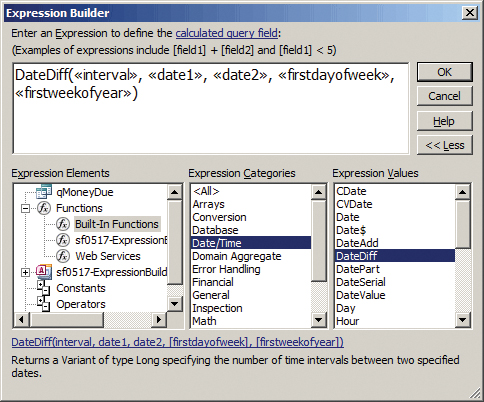
Our sample database contains qMoneyDue, a query that has a column for amount due and a column for the date due. To calculate the days overdue, open the query in Design view and click in the Field cell of a blank column. Launch the Expression Builder. In the Expression Elements column, click on the plus sign next to Functions to expand the choice of functions to view, and then click Built-In Functions. In Expression Categories, choose Date/Time. Then double-click DateDiff in the Expression Values list on the right. This will add it to the text box.
Access inserts the function name with parentheses around placeholders for the arguments that the function needs to evaluate the difference between two dates, as shown in Figure 1. The first argument is an interval of time. Common intervals are “d” for day, “m” for month, “q” for quarter, and “yyyy” for year. The next two arguments are the first date followed by the second date. If the second date is earlier than the first, a negative number will be returned.

The last two arguments are optional: The first day of week defaults to Sunday, but you can use this argument to set a different first day of the week or to or to follow system settings. The first week of year defaults to the week in which January 1 occurs, but it can also be the first week that contains at least four days or the first full week, or it can be set to follow system settings.
Be sure to replace all of the placeholders with the arguments you want, and delete the optional placeholders you don’t need. To get the number of days overdue, change the «interval» placeholder to "d" by double-clicking the placeholder to select it, then typing over it. Next, select the «date1» placeholder. In the Expression Elements pane, click the active query name (qMoneyDue). The query fields will appear in the Expression Categories pane in the middle. You can double-click the DateDue field there to add it to query. You can also simply select it and then double-click its value property in the Expression Values pane on the right.
The last date will be today. Select the «date2» placeholder and replace it with the Date() function. Delete the optional placeholders and commas. Click OK to close the Expression Builder and add the expression to the cell.
Because every calculated field must have a name, Access will assign it “Expr1” (and the next calculated field without a name would be “Expr2,” and so on). The calculated field name should be changed to something more descriptive, like “DaysOverdue.” Within the field definition, a colon separates the name and formula, so the final expression is DaysOverdue: DateDiff("d", [DateDue], Date()), as shown in Figure 2.

Download this month’s database: sf0517-ExpressionBuilder.
SF SAYS
The Expression Builder is a great tool for creating formulas and exploring functions.

May 2017


