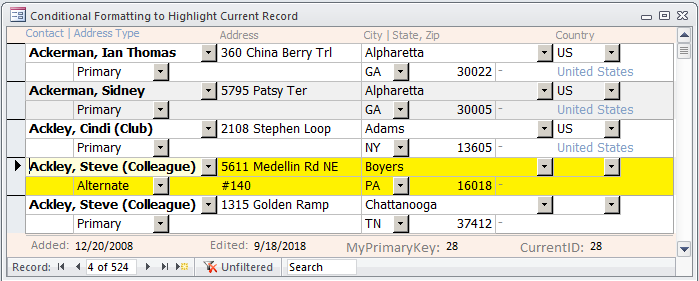
Consider a continuous form displaying names and addresses. Even with banded coloring (e.g., where every other record is shaded a light gray), it would be difficult to navigate through the records and keep track of which one is selected without losing your place occasionally. With conditional formatting, however, the current record can be given a yellow background, such as in Figure 1.

TRACK THE CURRENT RECORD
The key—literally—to keeping track of the current record is the primary key for the underlying table. For the table shown in Figure 1, the primary key is a sequential AutoNumber field named MyPrimaryKey. Note the textbox control at the bottom of Figure 1 displaying the value for MyPrimaryKey. Next to that is a control named CurrentID. When a record’s MyPrimaryKey value matches the CurrentID value, then it will be highlighted on the form.
CurrentID is set using VBA. Each time the cursor moves to another record, the Form_Current event is run. By adjusting the VBA code for this event, we can set the CurrentID value to match the newly selected record’s MyPrimaryKey value and, thus, keep track of which record is current.
In Design view, open the Property Sheet and select Form from the dropdown. Go to the Event tab. In the On Current property, select [Event Procedure], then click the builder button (or press CTRL+F2) to go to the Visual Basic Editor. Change the code so it reads:
Private Sub Form_Current()
With Me
.CurrentID = Nz(.My
PrimaryKey, 0)
End With
End Sub
“With Me” tells Access that references that begin with a period in this code refer to objects on the form. Nz is the null-to-zero function. The first argument is the value to return, and the second argument specifies what to use if the first argument doesn’t have a value. When a new record is created on the form, it won’t have a value for MyPrimaryKey initially, which would cause an error. Using Nz here avoids that problem by setting the value of CurrentID to 0 in those instances.
This code can be reused to track the current record on other forms you design by substituting the name of your primary key control for MyPrimaryKey, such as ContactID, OrderID, AddressID, etc.
ADD THE HIGHLIGHT
Figure 2 shows the form in Design view. The Detail section of the form contains controls to display data from each record, such as the address, city, country, and so forth. The Back Style property for each of these fields is set to Transparent.

Behind these controls is an unbound textbox control named “txtHighlight” that will be used for the highlighting. The control is the height of the Detail section and the width of the form. The Top and Left properties for txtHighlight are both 0, Enabled is No, Locked is Yes, and Tabstop is No.
With the txtHighlight control selected, go to the Format tab on the ribbon and select Conditional Formatting. In the Conditional Formatting Rules Manager dialog, click “New Rule” to open the New Formatting Rule dialog. In the section for editing the rule, choose “Expression is” from the dropdown, then enter this rule: Nz([MyPrimaryKey], 0) = [CurrentID]. This essentially is telling Access that when the value of MyPrimaryKey is equal to CurrentID (or if there is no primary key yet), then apply the formatting.
We want yellow shading to be applied if the rule is true, so click on the paint bucket icon to set the back color to yellow. (You can also set other formatting to be applied, such as bold, italic, and so forth.) Then click OK on each dialog box until you are back to the form. Save the form, then switch to Form view. As you move from record to record, the yellow highlight appears to show you which record you’re on.
Finally, to prevent the txtHighlight control from coming to the front and covering up the other controls, add code to its On Got Focus event to switch to another control:
Private Sub txtHighlight_GotFocus()
'move to some other control if highlight gets focus
Me.CID.SetFocus
End Sub
In the code, “CID” is the name of a different control on my form. When adjusting the code in your database, you would replace that with the name of one of your controls sitting on top of the txtHighlight control, e.g., Me.ControlName.SetFocus.
DATASHEET FORMS
You can also use highlighting like this if you have a datasheet form. The difference is that, instead of having the color appear using a separate control like txtHighlight, you can set the same conditional formatting rule for each control in the form. Simply make sure all the appropriate controls are selected before you click the Conditional Formatting icon to set the rule and format.
Download this month’s database: SF1810--Highlight-Current-Record.
SF SAYS
With a control, some conditional formatting, and a little VBA, you can highlight the current record in a form.

October 2018


