
A simple example to demonstrate the advantages of a combo box is a list of customers. Most databases use an Autonumber field to generate unique customer IDs. Yet customers might not know or remember their customer ID, or database users working might find it easier to use customer names. A combo box on a form lets you display a list of customer names that the user can choose from—while the table actually stores the customer ID.
Consider a database that has a number of connected tables, such as in Figure 1. The purpose of this database is to record payments that customers make when they order products. In this case, products are custom-built, and there’s a separate order for each item.
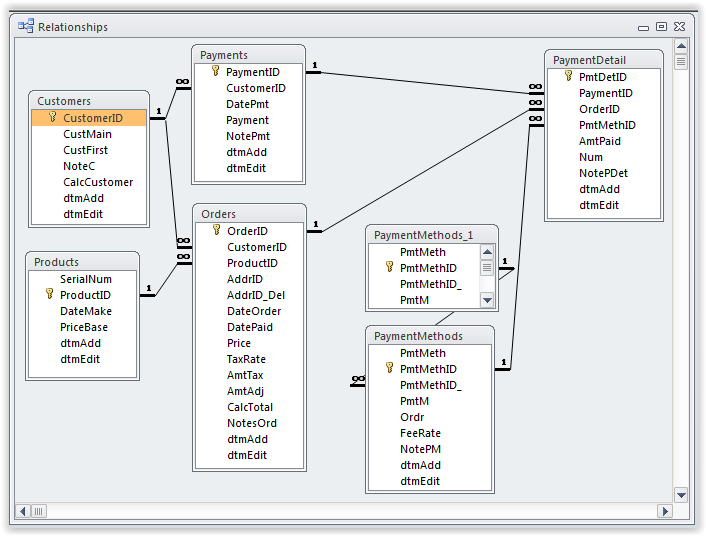
The f_Payments form, based on the Payments table, was created to enter payments as they’re received from customers. The problem is that the table stores the CustomerID, a number, with each payment. So how can the list of customers be displayed in a way that makes it easy for users to choose the right one? Create a combo box that gets its list from the Customer table.
In the original f_Payments form, CustomerID was a text box. Open the form in Design view. Right-click on CustomerID and choose Change To, Combo Box. If the Property Sheet isn’t displayed, press Alt+Enter to make it visible.
Begin with setting the source for the list. On the Data tab of the Property Sheet, click in the Row Source property and then on the builder button (...). This opens a Query Builder window as well as the Show Table dialog box. In Show Table, double-click Customers to add it to the query design, then close the dialog box.
From the Customers field list, add CustomerID to the query design grid. This is the value that will actually be stored in the Payments table. Also add CalcCustomer to the grid, and set it to sort by Ascending. (This calculated field combines the CustMain field, which holds a company name or an individual’s last name, and the CustFirst field, which contains an individual’s first name—thus, creating an easily sortable list of customers that includes both companies and people.)
Switch to Datasheet view to see values for the combo box. Resize the columns so that they’re wide enough for all the values in CalcCustomer to be read. It looks like it needs to be about 2" wide to display the names fully. The CustomerID column, containing the numeric key, will be hidden, so its width doesn’t matter.
Close the query builder. Access will ask if you want to save changes to the SQL statement and update the property. Choose Yes.
Next, set the combo box properties to ensure the data will be displayed properly. With the combo box selected, go to the Format tab of the Property Sheet. Set Column Count to 2, Column Widths to 0;2" (this makes the first column hidden and the second column 2" wide), and List Width to 2.2" (which is the sum of the column widths plus a 0.2" to allow for a scrollbar).
Save the form and switch to Form view. Now you can pick the customer name from a dropdown list. No numbers for CustomerID are displayed, even though that’s the data actually being stored in the Payment table.
There are even more possibilities. For example, what if you wanted to show the total sales of each customer? Go back to the Design view of the form and again open the Query Builder for the combo box row source. Choose Show Table, and add the Orders table.
From the Orders field list, add CalcTotal to the grid. This will cause a customer to display more than once if the customer has placed more than one order. To get customers to show only once, go to the ribbon and click the Totals button to add the “Total” row to the grid. All columns will default to Group By. For CalcTotal, change the setting to Sum. Now, each customer will only appear once, along with the sum total of orders entered for that customer.
Since more than one column now appears in the combo box, you should include column headings at the top of the dropdown. That means each displayed column needs a user-friendly alias. On the grid, change CalcCustomer to Customer: CalcCustomer and CalcTotal to SumOrders: CalcTotal.
Close the query builder and again choose Yes to save the changes. With another column having been added, the combo box properties also need to be updated. Set Column Count to 3, Column Widths to 0;2";1", List Width to 3.2", and Column Heads to Yes.
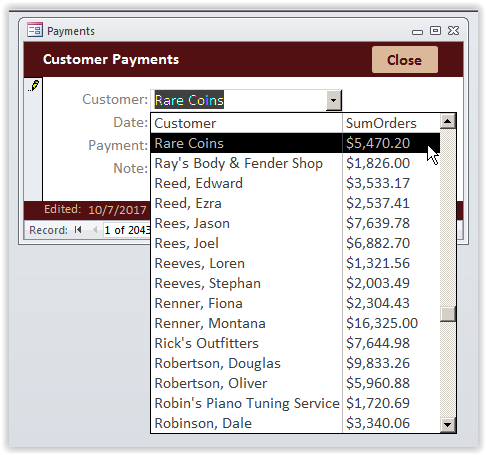
Save the form and test it. See Figure 2 for the final results.
Download this month’s database: sf_1710_Creating-a-combobox.
SF SAYS
A combo box simplifies data entry by providing a defined list of user-friendly values to choose from.

October 2017

