The sample data for our example comes from a custom shop that builds and sells movable storage buildings delivered to a customer’s property. When a sale is made, it may be paid outright or over a period of time. Each time a customer visits, calls, or sends mail or email to make a payment, a new payment group is created in the database with the customer and date. There is capability to add as many detail records as are needed.
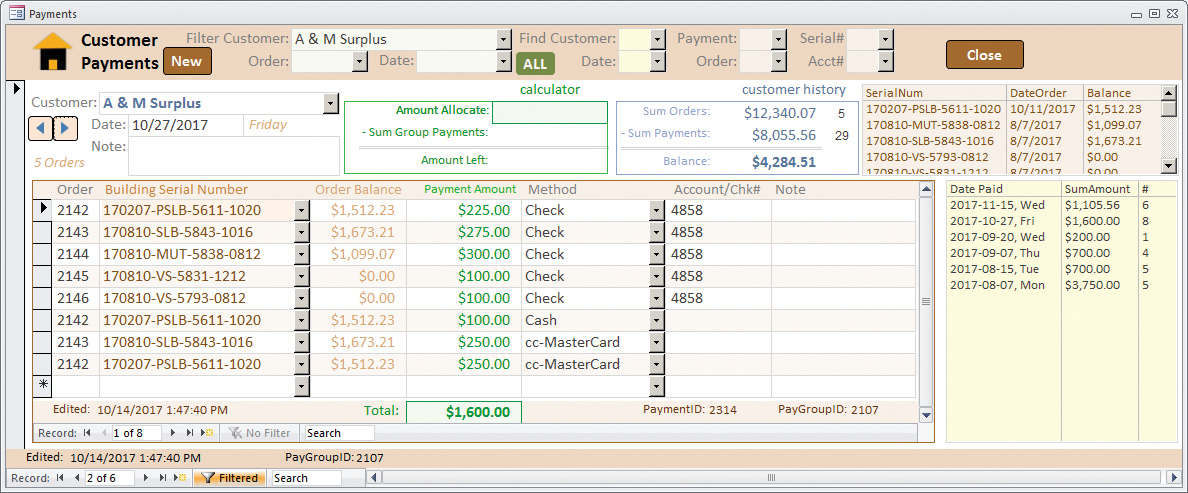
The center of all this activity is the f_PAYMENTS form (see Figure 1). It displays a variety of information about the customer, including orders, payments, balances owed, and more. The form is based on the PayGroups table, which stores the customer ID and date, along with other fields.

This month we’ll look at various elements on this form and how to add a payment. Future articles will address problems, enhance capabilities, and explain more about the data structure and how the form and subforms work.
SUBFORMS
There are three other forms embedded in the f_PAYMENTS form: f_Payments_sub, fsub_CustomerBalance, and fsub_Logo. These are the subforms, with f_PAYMENTS as the main form. All forms are displayed in the Navigation Pane in the same way, so it’s always a good idea to include “sub” in the form’s name when you know it will be used as a subform. Where you add the “sub” to the name can depend on where you want the name to appear when the objects are sorted. In this case, f_Payments_sub is designed specifically for use on the f_PAYMENTS form. Adding “sub” to the end ensures that it gets listed right after its main form when objects are sorted alphabetically. The other subforms, fsub_CustomerBalance and fsub_Logo, are subforms that also may be used somewhere else, so “sub” is added to the beginning. This will group all common subforms together. Strategies for naming objects are personal, but they should have thought behind them.
The f_Payments_sub form shows payment amounts, where the payments came from, and what they apply to. This form is continuous, which means it can display multiple records—essentially, all the payments from a particular customer on a specific date. A customer can make payments on several orders with one check or charge or pay part of a purchase with cash and part using another method.
The fsub_CustomerBalance form is used for the customer history section. It shows the sum and total number of orders and payments as well as the balance due. This subform is based on the Payments table, which is synchronized to the main form using CustomerID for the subform’s “Link Master Fields” and “Link Child Fields” properties (found on the Data tab of the Property Sheet for the subform).
The fsub_Logo is located in the upper left of the main form. This is used to display the company logo.
LIST AND COMBO BOXES
On the right of the main form are two list boxes showing information relevant to the customer. The tan list box displays customer purchase data with serial number, order date, and balance. The yellow list box below shows payment dates, amount paid, and number of payment splits. It also finds records.
The form header contains unbound combo boxes to filter and find records. Filters can be set for customer, order number, and/or date. The combo boxes to the right allow the user to find existing records by customer, date, order number, serial number, or account or check number.
ADD OR EDIT A PAYMENT
Suppose that A&M Surplus wants to make a total payment of $800 to be split among the orders it has due. The first step is to use the Filter Customer combo box to select A&M Surplus. Click the New button to enter a new payment. To the right of the customer field is a calculator. This can be used to help keep track of the amount as the payment is spread across multiple orders. Enter $800 in the Amount Allocate field, if you want to use the calculator.
In the f_Payments_sub section of the form, select one of the orders that the payment is going to be applied to: If you know the order number, it can be entered. Alternately, you can use the combo box to pick a serial number. Once a building (i.e., product) is identified, the Order Balance field is calculated and displayed.
Press tab to move to the Payment Amount field. Enter the amount of the payment that’s going to be applied to this order, such as $300. (Once you tab off that field, the calculator will update to show there is $500 left to allocate.) The next tab stops are the method of payment and account or check number. There’s also a field for entering a note, but there isn’t a tab stop, so you need to click the mouse in the field to enter a note.
After the payment amount is specified, the balance for that order is recalculated, as is the total for the payment group. The numbers also update in the other areas of the main form. This enables payments to be distributed differently to see the effects. Perhaps someone wants to pay more on big orders or pay orders with low balances to close them. The calculator lets you distribute payments and then modify them to achieve the optimum or desired results.
Download this month’s database: SF_1711_Mainform-Subforms_Payment.
SF SAYS
Use a main form with subforms to enter data into multiple tables with efficiency and flexibility.

November 2017


