When planning your database, think about what you have to put in rather than focusing on the output, like reports. The data structure—how your tables and relationships are set up—is like the foundation of a building. It needs to be organized well and constructed solidly so that what gets built on top is stable and flexible.
Any database construction should begin with structuring data, but be prepared to make changes as you develop the database. As you get a better understanding of the shape and form the database is taking, you want to translate that increased knowledge into improving the data structure.
TABLES AND FIELDS
Tables are composed of fields. Each field has a name, a data type, size, and other properties. A property is a descriptor, much like someone’s physical appearance can be described by characteristics such as gender, height, weight, eye color, and hair color.
Deciding how to organize fields into each table is driven by how things relate in the real world. Think of the different “nouns” (people, places, things, events) that you will track in your database: customers, addresses, phone numbers, invoices, notes, products, purchases, payments, and so on. These main ideas will become tables. And each of these nouns will be described with adjectives, or fields.
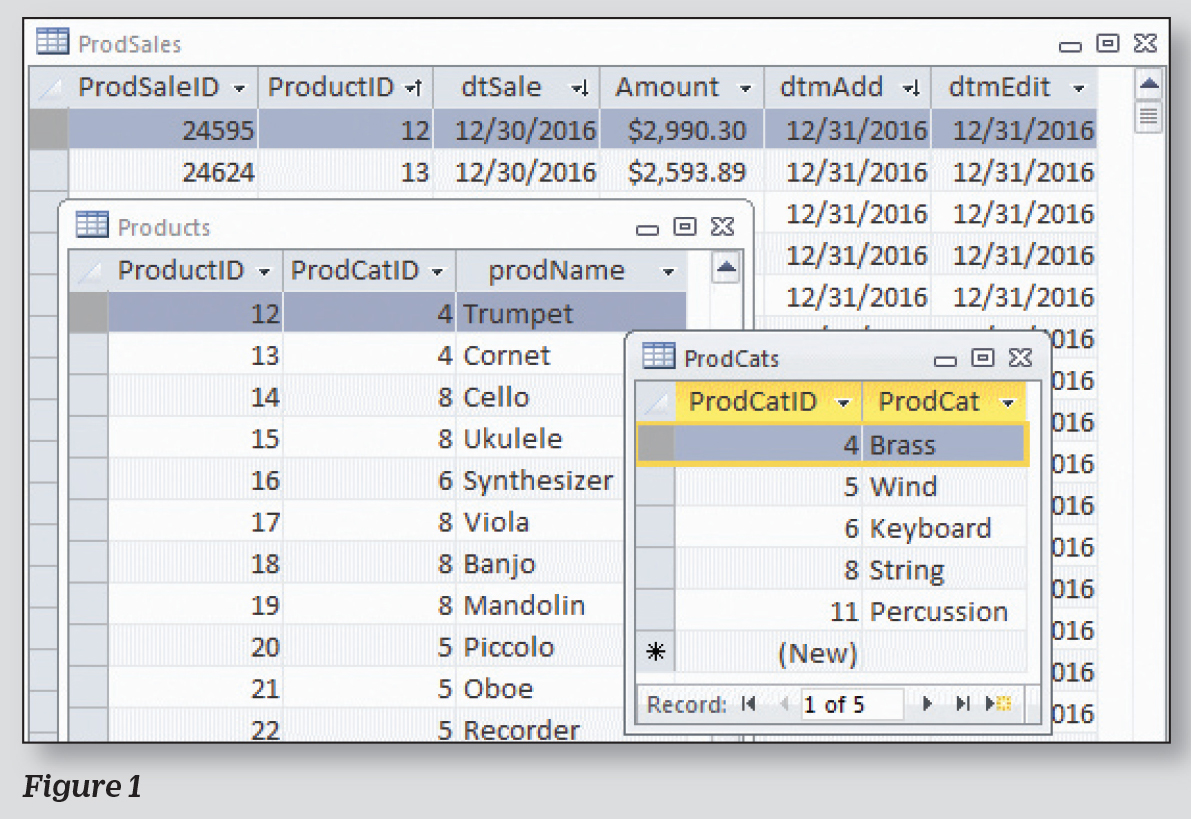
Figure 1, for example, shows three tables: ProdSales, Products, and ProdCat. Each of those represents a different “noun”: sale, product, and category. Each respective table then includes fields that describe these nouns. The ProdSales table stores information about each sale. The product sold is stored in a field called ProductID. The first record shows that the ProductID is 12. In the Products table, you can see that 12 is a trumpet with a ProdCatID of 4. The ProdCat table shows that 4 represents the Brass product category.
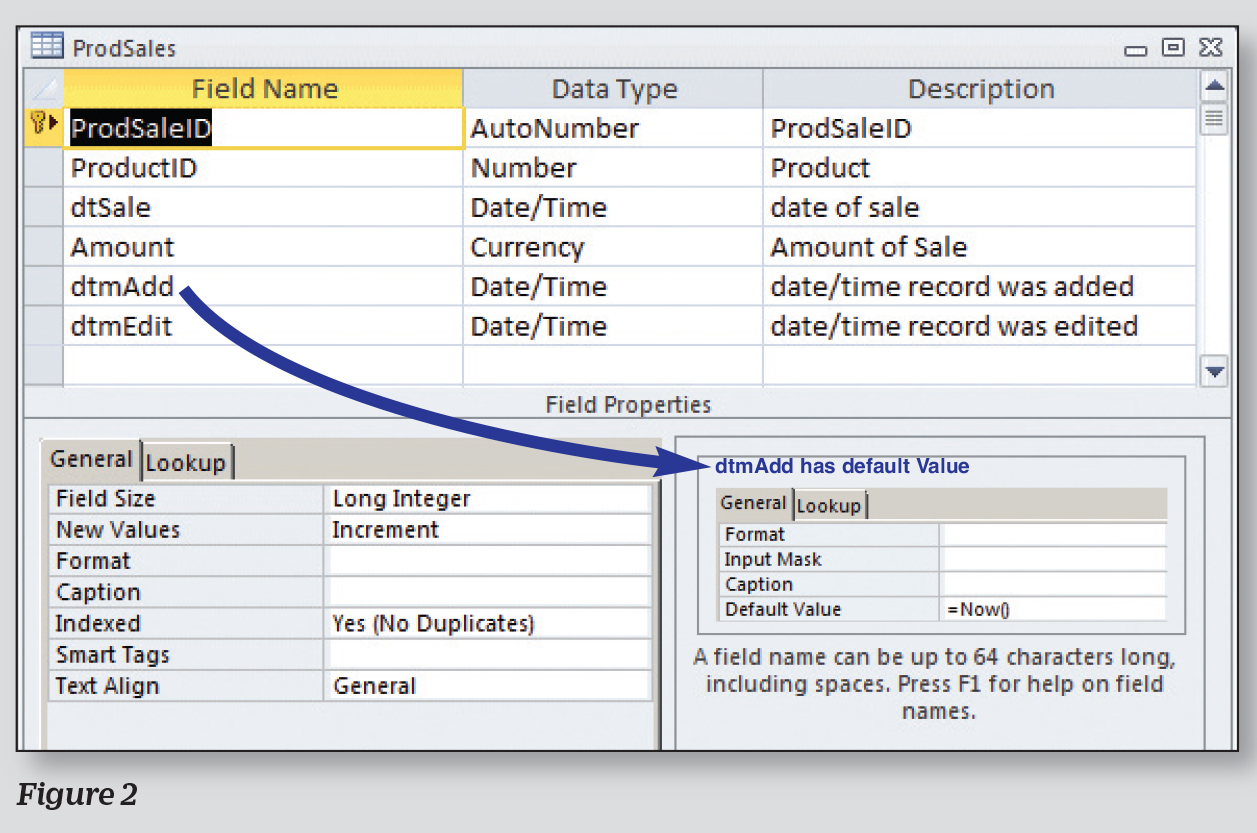
Each table should have a primary key. The primary key is a field (or combination of fields) that has a unique value for each record in that table. Often, this involves creating a number field that gets its value automatically (AutoNumber), such as the ProdSaleID field in the ProdSale table.
DATASHEET VIEW
When you double-click a table in the Navigation Pane, it opens in Datasheet view. This view looks like Excel with rows (records) and columns (fields). In the lower left are buttons you can click to move to the first, previous, next, and last records. To create a new record, click the button with a yellow sunburst. Records are always added at the end.
You can also see which record number you are on and how many records are in the table. To quickly move to a record, click in the Record Number area, type a number, and then press Enter. Record numbers change depending on how the data is sorted.
At the top of each column is the field name. Next to the name is a down arrow you can click to sort and filter. Sorting rearranges the data. Filtering limits the records that are displayed.
DESIGN VIEW
To modify a table, right-click a table name in the Navigation Pane and choose Design view. If the table is already open, click the icon on the ribbon in the View group to change to Design view. Figure 2 shows the ProdSales table in Design view.
At the top are the field names, data types, and field description. The lower pane shows additional properties of the selected field. What’s displayed there varies depending on the field’s data type.
Field names can be 64 characters, which is more than you should use since names should be concise yet descriptive. Always start names with a letter and avoid using spaces or special characters (except an underscore). Each field name must be unique in each table and, with the exception of key fields (primary key and foreign key fields should have the same name in different tables since they are the same data), it’s good for the fieldname to be unique in the database. Field names may contain digits, but using numbers in a name is often an indicator that the data isn’t structured well.
For data type, you can choose Short Text, Long Text, Number, Date/Time, Currency, AutoNumber, Yes/No, OLE Object, Hyperlink, Attachment, Calculated, and Lookup Wizard. (We’ll look into these more deeply next month.)
Finally, the description is for explanations to provide more detail about the field. It’s a good idea to fill this out using content helpful to the database user, not the developer. When fields are dragged into a form for data entry, the description is used for Status Bar Text, which is displayed in the lower-left corner of the screen. Download this month’s database: sf-1701-designing-adatabase.

January 2017


