CREATE A FORM
From the Create ribbon, select Form Design to open a new unbound form in Design view. The first step of building a form is to add controls. Everything displayed on a form (or report) is in a control. Controls can have different functions. In a bound form, controls can be linked to specific data by setting the Control Source property to the appropriate field from the record source. Controls also can be calculated, where the Control Source is set to an equation, or they can be unbound, where they aren’t linked to data. Buttons, labels, lines, and rectangles are unbound controls.
First, add a title to the form. Select the label tool from the Controls group of the Design ribbon. (Look for the Aa icon.) Click near the top of the blank design space to drop the control. In the new label that appears, type “MENU” and press ENTER. From the Home ribbon, change the font size to 14. This will increase the size of the text and make it bigger than the label control. With the new label selected, move the mouse pointer over one of the square resizing handles on any side or corner, except for the upper-left corner. When the pointer changes to a double-headed arrow, double-click your mouse. This automatically sets the control size at the best height and width to fit its contents.
ADD BUTTONS
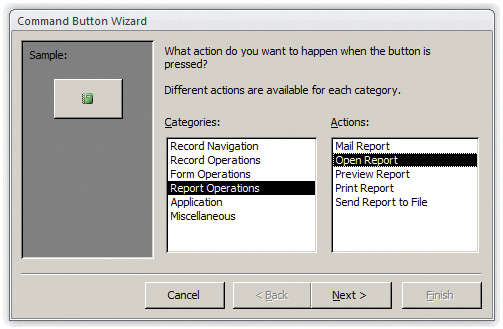
Next, add a button for opening reports. Select the Button tool from the Controls group. (Look for the “xxx” in a rectangle.) On the form design, click where you want the upper-left corner of the button to be. This will place the control and open the Command Button Wizard dialog. If the Command Button Wizard doesn’t begin, delete the newly created button and enable the wizard by selecting Use Control Wizards from the drop-list in the Controls group (click on the bottom-right corner of the Controls group). Then choose the button tool and try placing the button again.
Once the wizard begins, choose Report Operations from the Categories list and then Open Report from the Actions list (see Figure 1). Click Next. Select the report you want to open. In this case, it’s “r_SalesCrosstab_Percentages.” Click Next.

The wizard will ask if you want text or a picture in the button. Select the Text option and enter “Monthly Sales by Category Detail Report.” The next step will ask you to name the button. Enter “btn_OpenMonthSalesDetail” as the name, and click Finish.
Once you have created the first command button, repeat the same steps to place another button that will open a different report. This time, choose “r_SalesCrosstab_Percentages_Summary” for the report to open, “Monthly Sales by Category Summary Report” for the display text, and “btn_OpenMonthSalesSummary” for the name of the button.
Just as buttons can open reports, they also can be used to open other forms to display and edit information stored in tables. The database already contains a form for entering information about products that Mike’s Music sells, and we want to add a button to open the form.
Add a button control to the form. As you go through the steps of the Command Button Wizard, choose Form Operations from the Categories and Open Form from the Actions. Select “f_PROD_CATS” from the list of forms in the database, then choose “Open the form and show all the records.” Select the Text option and type “Edit Products” to be displayed. Name the button “btn_Products” and click Finish.
Save the form and call it “fMENU.” Change to Form view and test the menu. Click on each button to make sure the correct report or form opens. Close the objects when you’re done looking at them.
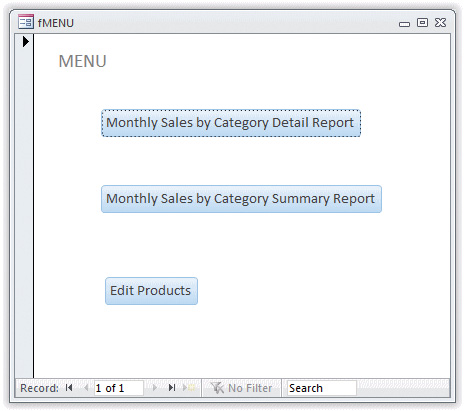
Once you confirm that the buttons work properly, it’s time to clean up the look and design of the menu. Note that there are record selectors on the left side of the form as well as navigation buttons and filters along the bottom (see Figure 2). Since this form isn’t bound to data, we don’t need the selectors. Switch back to Design view and open the Property Sheet. With the Selection Type set to Form, go to the Format tab and locate the Record Selectors property and Navigation Button property, setting both to “No.” Return to Form view, and they will be gone.

LOOKING AHEAD
This month, we created two separate buttons that open the Detail and Summary reports, respectively. (Download this month’s database: SF_July_2016_MenuForm.) But the only difference between the Detail and the Summary reports is that the detail section isn’t visible on the Summary report. It’s possible to set up one report instead and then program some logic that determines whether the detail or summary data gets displayed when the report opens. We’ll cover that next month when we discuss sections.
In addition, we will also address moving the title to the form header section of the menu, organize things the user can pick using a tab control, and create controls to collect criteria so reports only show certain records rather than everything. We’ll also make the menu form appear when the database opens.

July 2016


