THE QAT
When you first open Access, the QAT has three icons—Save, Undo, and Redo—and is located above the ribbon, sharing space with the title bar. To customize the QAT, click on the down arrow at the end of the QAT and choose “More Commands...” This will open the Access Options window directly on the Quick Access Toolbar Section. Select “All Commands” in the “Choose commands from” dropdown. The list on the left will show all the available choices, while the list on the right shows the commands already added to the QAT.
Commands are listed alphabetically. If you don’t want to scroll through the whole list, you can click on the list and then press a letter on the keyboard to quickly jump to that section. Once you find the command you want, either double-click it or click the Add button to move it to the list on the right.
We’re going to add a number of commands to the QAT, organized into relevant sections. There’ll be sections related to saving, relationships, windows, view, datasheet, align and adjust, and size. That way, you just have to remember what each group of icons does in order to quickly locate a specific command.
BUILD YOUR TOOLBAR
The QAT includes separators to keep it organized. These are listed as <Separator> at the top of the list of commands. To save time from having to scroll back up each time we begin a new section, it’s easier to add several first. In the list on the right, which shows the current QAT, select the last command (likely Redo). Anything we add from the list of commands will be added to the QAT below this item. From the left list, double-click <Separator> about 20 times.
Now let’s start adding commands. Select Redo on the right list again. On the left, locate the Save As command. This lets you save whatever object you are working on (such as a query) with a new name while you are looking at it.
That completes our first section, so go back to the list on the right and select the first <Separator>. Then click on the list of commands on the left and press R on the keyboard. Scroll down until you get to the Relationships commands. Note that there are several listed. Each is a different command. Use the mouse to hover over each option and see the tooltip. We want to add the Relationship that says “Database Tools Tab | Relationships | Relationships (DatabaseRelationships)” in the tooltip. Next, add the Switch Windows, Tile Windows Horizontally, and Tile Windows Vertically commands.
Next add icons for changing view. Click the next <Separator> on the right and then add the following commands: Design View, which works with tables, queries, forms, and reports; Datasheet View, which works for tables and queries; SQL View, for queries; and Clear Grid, which deletes columns in the grid when making a query. That one isn’t exactly a “view” item, but in my experience it’s a good place to put it.
Click on the next <Separator>, and then add Form View, Layout View, Print Preview, and Report View.
The next group is useful when in Datasheet view. Click the next <Separator> on the right. First, add Hide Columns. This is especially useful to hide the Click to Add column to prevent it from interfering when selecting all columns and best-fit in Datasheet view. Also add Unhide Columns, which shows a checklist for each field; Refresh All, which can show changes made by other users and processes; Totals, which adds a row below the data in which you can choose to display the sum, average, count, maximum, minimum, standard deviation, or variance for each field; Freeze, which works like the Freeze Panes command in Excel and “freezes” columns when you scroll; and Unfreeze, which does the opposite. Some of the icons for these commands are just a colored circle because Microsoft didn’t create images for them. As with any icon on the QAT, you can hover over them and read the tooltip.
Go back to the right and click on the next <Separator>. The next group of icons will help to quickly align and position controls when in Design view of forms and reports. Add Align Left and Align Right. Move to the next separator and add Align Top, and Align Bottom. Then, under the next separator, add Make Horizontal Spacing Equal and Make Vertical Spacing Equal.
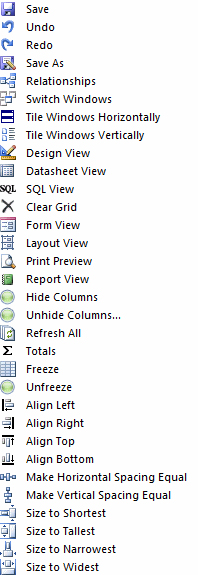
To make it easier to change size for selected controls, under the next separator add Size to Shortest and Size to Tallest. Finally, go to the next separator and add Size to Narrowest and Size to Tallest. Figure 1 shows the icons and commands now included in your QAT.
OTHER USEFUL COMMANDS
There are other commands you might find useful to include. For example, add icons that to make it quicker to order and group controls while in Design view for a form or report. Under the next separator, add Bring to Front and Send to Back. Then under the next separator, add Group (so controls move together) and Ungroup.
Under the next separator, add Special Effect and Remove Layout. While in Design view for a form or report, each control has a special effect that handles how its border appears: flat, raised, sunken, etched, shadowed, and chiseled. I normally choose flat for all controls. The only exception is that I often choose chiseled for checkboxes. The reason is to have the data stand out, not their labels or borders (which you may want to be a lighter shade of shade of gray). You can add icons for each of the border effects.
Remove Layout is useful to add since the form and report wizards often group controls in a layout. This command gives you a quick way to ungroup them so each can be individually sized and positioned.
When designing forms and reports, the field list and property sheet are mutually exclusive—they can’t appear at the same time. Under the next separator, therefore, add Add Existing Fields and Property Sheet.
Under the next separator, add About, which shows the version and build of Access being used. From here you can also click the System Info command button to see how much memory is installed, what processor you are using, and information about your hardware.
Finally, under the next separator, add Convert Macros to Visual Basic, which lets you more easily see and document what’s being automated using VBA.
SHOW QAT BELOW THE RIBBON
Below the list of commands on the left is the option to “Show Quick Access Toolbar below the Ribbon.” Check this box—this many icons won’t all display above the ribbon. Click OK to close the dialog box. Access might tell you that you have to close and reopen the database to see changes, but that isn’t true. The revised QAT will show immediately.
IMPORT A CUSTOMIZED QAT
You can also import a customized QAT. The Customize Quick Access Toolbar dialog box includes an Import/Export button. Click that, and select “Import customization file.” For example, if you want to customize the QAT like we discussed in this column, download my QAT customization file: accesscustomizations.

December 2016


