Say that you want to embed one or more ranges from an Excel workbook in a Word document. For example, you might be preparing a quarterly report that needs a table from the income statement, another table from the balance sheet, and a third range with some key metrics.
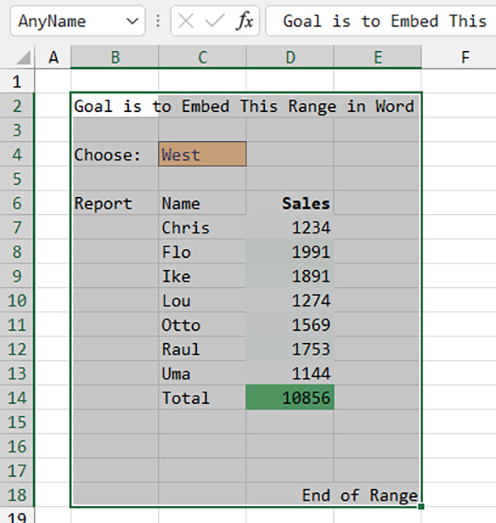
The method described here will create a link between Word and Excel. If the data in the Excel workbook changes, those new values will appear in Word. If the number of rows in the embedded workbook changes, the height of the worksheet in Word will increase.
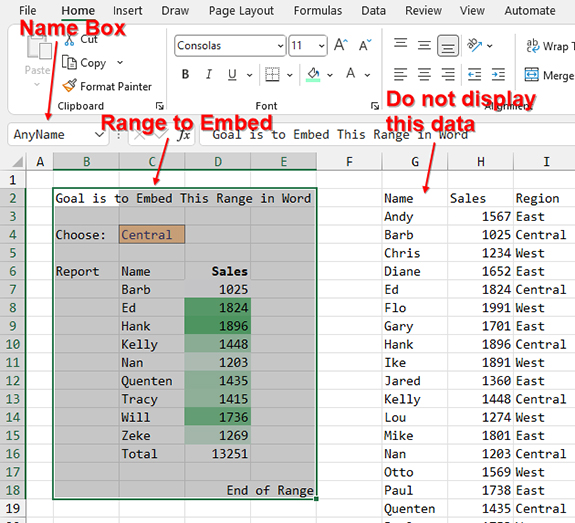
Say that you’re embedding B2:E18 but that the results in that range refer to cells outside of the range. When those cells outside the range change and the cells inside the embedded range change, the Word document will also update to show the numbers.
An IMA® member recently wrote in saying that their method for embedding an Excel workbook in Word had stopped working. If the height of the range increased, the new rows were being truncated from the linked Excel object in Word.
I have found a set of eight steps that successfully embed a dynamic live view of the Excel range in Word. None of the steps is optional. You have to do these steps in this order to set up the live link. In short, you have to name the range to be embedded and then copy the entire range from Excel. When you paste in Word, you have to open a subtle Paste Options menu to choose to create the link.
This is always a frustrating process for me because some of the steps aren’t obvious. Here are the eight steps:
1. Save the Excel workbook with a path and filename. It can’t be an unsaved Book1. Whoever will be opening the Word document should have access to the same path and filename.
2. In Excel, create a name for the range that should appear in Word. One easy way to create a name is to select the range, click in the Name Box that appears to the left of the formula bar, type a name without spaces, and then press Enter. For example, valid names might be PartOne, Income_Statement, or SectionOne. After you press Enter, you should see the new name appear in the Name Box. Note that it’s also fine to create named ranges using the Name Manager on the Formulas tab if you prefer.
3. Select the entirety of the area described by the Named Range. One easy way is to open the drop-down menu in the Name Box and select the named range. This will jump to and select the entire named range.
4. Copy the range using Ctrl+C or the Copy icon.
5. Switch to your Word document.
6. Place the cursor in the spot where you want the Excel workbook range to appear.
7. Paste using Ctrl+V or the Paste icon.
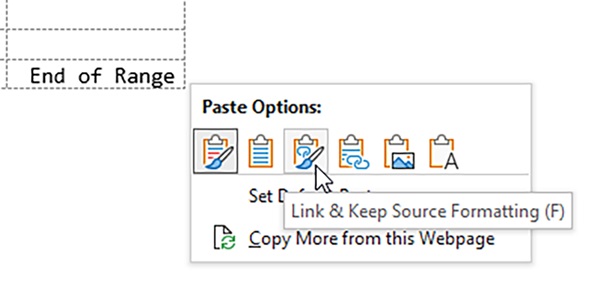
8. Immediately after pasting, the Paste Options drop-down menu appears just below the pasted range. Open this drop-down and choose the third icon, which has a tooltip saying “Link & Keep Source Formatting.” The Link portion of this option makes sure that changes in the Excel workbook will be reflected here. The Keep Source Formatting makes sure that the fonts and colors from Excel aren’t changed.
At this point, if both the Excel workbook and the Word document are open, any changes to the Excel document are immediately reflected in the Word document—even before the Excel workbook is saved.
The “instant update” feature stops updating once you close the Excel workbook. If you close the Excel workbook and then reopen it, the Word document won’t update automatically. At this point, you could press Ctrl+A in Word and then F9 to update. Or close the Word file and reopen it while the Excel workbook is open to enable instant updating.
In real life, changes will happen to the Excel workbook when the Word document isn’t open. When you open the Word document, you’ll be asked, “This document contains links that may refer to other files. Do you want to update this document with the data from the linked files?” When you choose Yes, the changes from Excel appear in the Word document.
Adding Rows or Columns to the Embedded Range
The Excel workbook might expand over time. In order for any new rows or columns to automatically appear in Word, you need to make sure to insert new rows or columns inside of the named range.
For example, let’s say the embedded range is B2:B18.
If you need to add new rows, make sure to insert them above row 18 so the named range automatically expands. In a similar fashion, any new columns should be inserted to the left of column E so the named range includes the new columns.
I often joke that Word is just for people who can’t type letters in Excel. But there are certainly times where you need a combination of Word paragraphs and Excel tables all in one package. Using these eight steps will allow it to work seamlessly.

July 2023


